출처:
http://cafe.naver.com/bnlifepub/29
http://blog.naver.com/hunj?Redirect=Log&logNo=60062562067
회사에서 관리하는 지수중 배송기간 ( Lead time ) - 고객이 주문을 넣은 날서부터 물건을 보낸날까지의 기간 - 이란 것이 있다.
고객은 주문을 일찌감치 넣었는데 내부에서 우물쭈물하다 시간을 끌고 있는지
얼마만에 물건을 보내주고 있는지...뭐 이런거다.
오늘은 피벗테이블 ( Pivot Table )로 간단하게 이것을 계산해보자.
아래와같은 데이타가 있다. ( 데이타 샘플을 다운 받으시길 바란다 )
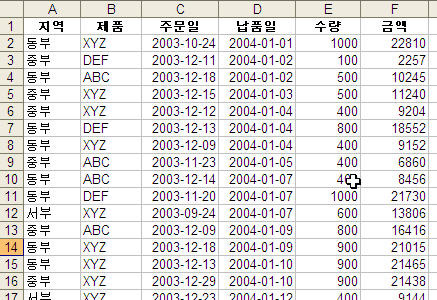
<그림1>
여기서 우리가 해야할 것을 월별로 Lead time을 계산해보는거다.
보다 구체적으로 야그해보면 해당월에 들어온 주문중 해당월에 발송된 주문이 몇퍼센트인지를
계산해보는거다. ( 물론 월말에 들어온 주문이야 그 달에 배송한다는 것이 어렵지만 여기서는
무시하고 넘어가겠다 )
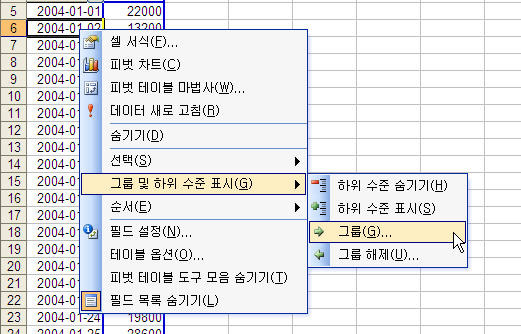
위 데이타를 가지고 피벗을 만들면서 귀찮은 문제에 직면하게 된다.
'주문일', '납품일'을 월별로 그룹핑을 하려고 하는데 문제는 열필드에 넣을 '납품일'이란 필드에서 발생한다.
잘 아시다시피 엑셀의 열갯수는 256개가 최대다. 그런데 납품일( 주문일 필드를 넣어도 마찬가지) 의 item갯수가 256개를 훨씬 초과한다는 사실이다. 그래서 납품일을 열필드에 넣을 때
아래와 같은 에러메세지를 보게된다.

<그림2>
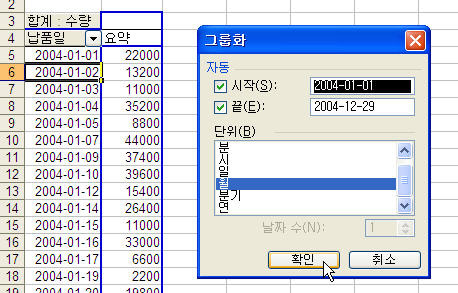
그럼 어떻게 하지? 뭘 어떻게 하나 6만개 이상 넣을 수 있는 행필드로 일단 넣고 그룹핑을 한 후
열필드로 옮기면 되지...( 참~ 십~조~어 ^^)
<그림3>
<그림4. 주문일, 납품일이 날짜데이타 형식으로 되어 있으면 아래와 같은 친절한 창이 뜬다>
그다음 주문일을 행필드로 옮기고 마찬가지로 그룹핑을 해준다.
계산필드에는 금액을 넣어 준후 각 월별 퍼센트를 구해준다
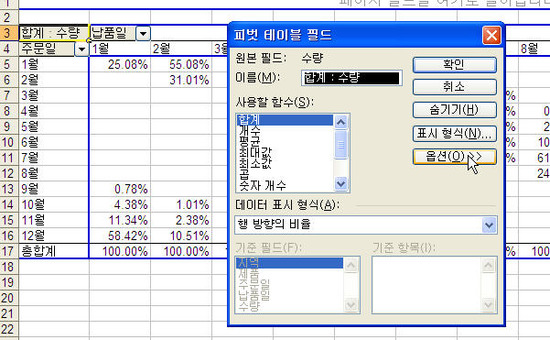
<그림5. [옵션]버튼을 누른 후 [데이타 표시 형식]을 위처럼 조절한다>
이제 다 끝났다. 아래 그림의 노란색부분이 그 달에 들어온 주문중 그 달에 나간 주문량의
비율이다.
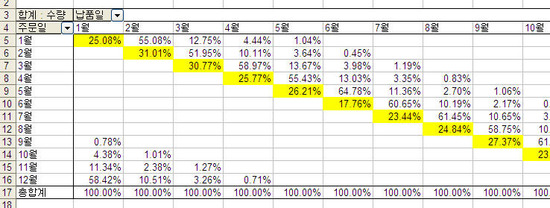
<그림6>
피벗테이블( Pivot Table )의 좋은 점은 무엇인가?
.
.
.
그렇지 쉽게 꺽을 수 있다는거다. 월별, 지역별로는 어떤지 한 번 꺽어볼까나?
걍 지역필드를 행필드에 던져 넣기만 하면 끝이다.

<그림7>
피벗은 정말 엑셀의 꽃중의 꽃이다. 아니 "꽃보다 피벗"이다.


